So nutzen Sie den Shopify Advanced Action Listing Report
Was ist der Shopify Advanced Action Listing Report?
Der Shopify Advanced Action Report ist ein spezieller Bericht von Impact, der exklusiv für Shopify erstellt wurde. Um diesen Bericht anzuzeigen, müssen Sie in Ihrem Impact-Konto angemeldet sein. Dieser Bericht bietet Ihnen detaillierte Informationen zu den Aktionen, die Sie an unser Programm weitergeleitet haben, darunter: Kostenlose Testversionen , kostenpflichtige Testversionen und Online-Verkäufe . ( POS Pro-Verkäufe sind ebenfalls in diesem Bericht enthalten.) Sie können auch detailliertere Daten hinzufügen, z. B. die Länder-ID (Land des Händlers), die SubID , die SharedID und die Kunden-ID . So können Sie Ihre Leistung besser verstehen, Ihre Marketingtaktiken verfeinern und Ihre Provisionen klar erkennen.
Zur Erinnerung: Wenn Sie einen Händler empfehlen, durchläuft dieser zunächst eine kostenlose Testversion > eine kostenpflichtige Testversion > einen Vollpreis-Händler. Mit diesem erweiterten Aktionsbericht von Shopify können Sie besser nachvollziehen, wie viele provisionspflichtige Aktionen Sie verzeichnet haben (Online-Verkauf = Vollpreis-Monatsplan = verdiente Provision).

* Bitte beachten Sie, dass dieser Bericht periodenbezogen ist. Für Kohortendaten verwenden Sie bitte die Shopify-Kohortenberichte.
Aktivieren Sie den „Shopify Advanced Action Report“, damit er immer in Ihrem Menü „Berichte“ angezeigt wird.
- Melden Sie sich bei Ihrem Impact-Konto an
- Navigieren Sie zu Berichte > Alle Berichte

- Scrollen Sie zum Ende der Seite
Unten auf dieser Seite finden Sie den Abschnitt „Benutzerdefiniert“. Hier finden Sie alle von Impact und Shopify individuell erstellten Berichte, die Ihnen helfen, den Erfolg zu messen und die Leistung zu optimieren.

- Wenn der Bericht noch nicht in Ihrem Dropdown-Menü „Berichte“ angezeigt wird, klicken Sie unter „Aktionen“ (rechte Seite der Tabelle oben) auf „Zum Dropdown-Menü „Berichte“ hinzufügen“, um sicherzustellen, dass er Ihnen nach der Anmeldung immer zur Verfügung steht.

Sobald Sie dies tun, wird der Bericht immer automatisch in Ihrem Dropdown-Menü „Berichte“ angezeigt (oben in Ihrem Impact-Dashboard).
Verwenden des Shopify Advanced Action Listing Report
- Klicken Sie im Menü „Berichte“ auf den Bericht, den Sie verwenden möchten (z. B. Shopify Advanced Action Listing ) .
- Wählen Sie Ihren [Datumsbereich]
- Klicken Sie anschließend auf die Lupenschaltfläche, um den Bericht auszuführen. Hier ist ein Beispiel, wie er aussehen könnte.

Ein Glossar der Spaltendefinitionen finden Sie unter: Erweiterter Aktionslistenbericht: Spaltendefinitionen .
Ausstehend = Aktion wurde nicht gesperrt. Aktionen werden am 21. des Folgemonats gesperrt (z. B. Aktionen vom 5. April werden am 22. Mai gesperrt). Ausstehende Aktionen können aufgrund von Betrug storniert oder erstattet werden.
Genehmigt = Aktion wurde nicht rückgängig gemacht und ist gesperrt. Diese Aktionen wurden auch bezahlt.
|
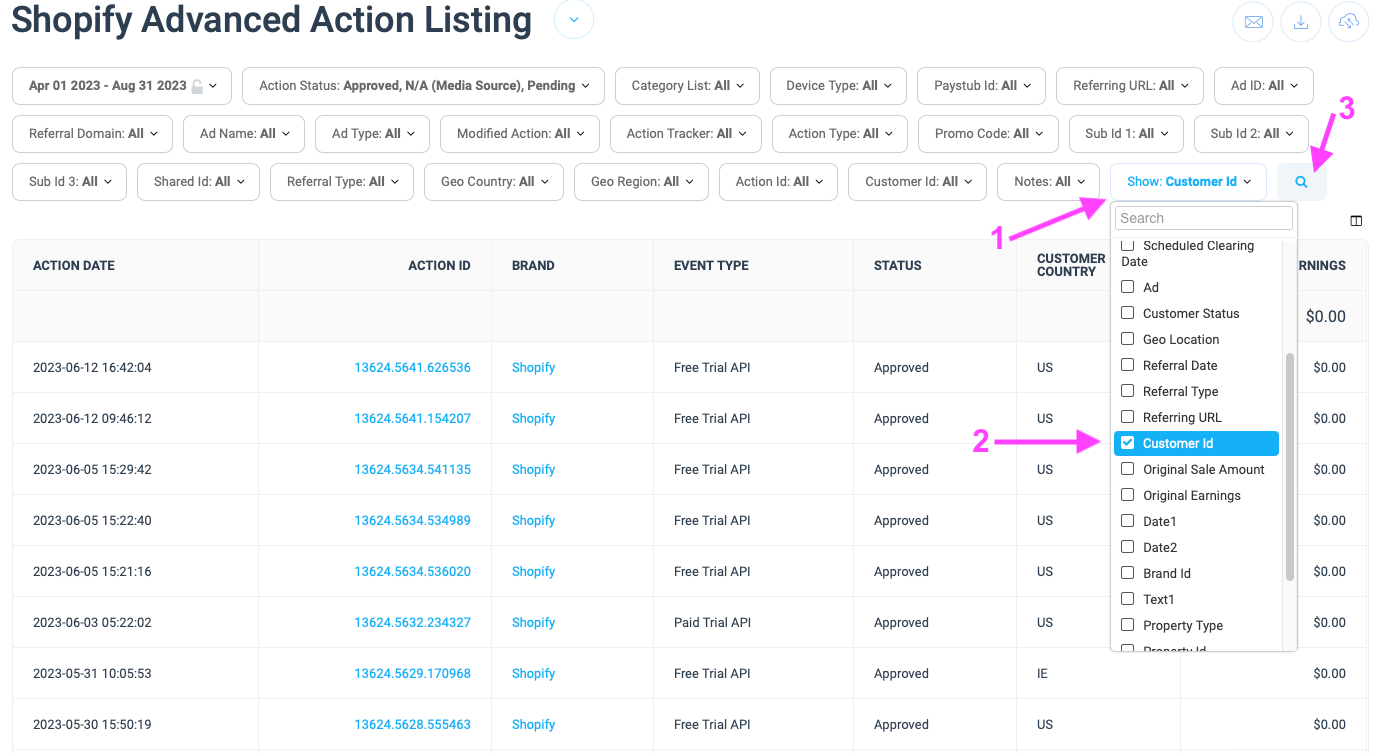
PROFI-TIPPS: Im Shopify Advanced Action Listing-Bericht können Sie neben der Standardansicht weitere Felder hinzufügen. Unten sehen Sie, dass durch Klicken auf das Dropdown-Menü „Anzeigen“ ein wichtiges Feld ausgewählt wurde: Kunden-ID. Dadurch können Sie die Shop-ID eines empfohlenen Händlers sehen. Falls Sie Unterstützung vom Shopify Affiliate Team bezüglich einer bestimmten Empfehlung benötigen, ist die Kunden-ID die beste Information für eine zeitnahe Antwort unseres Teams. |

So zeigen Sie die Kunden-ID für jede Transaktion an:
- Klicken Sie auf das Dropdown-Menü „Anzeigen“
- Scrollen Sie nach unten und aktivieren Sie das Kontrollkästchen „Kunden-ID“.
- Klicken Sie auf die Lupe, um den Bericht auszuführen. Dieser enthält nun eine Spalte mit der Kunden-ID für alle Ihre Aktionen.

Berichterstattung nach Kundenland
Als Nächstes betrachten wir eine sehr wichtige Information, die Ihnen bei der Prognose potenzieller Einnahmen hilft: das Kundenland. Da unser Programm abhängig vom Land des Händlers bezahlt, können Sie anhand des Herkunftslandes Ihrer Empfehlungen Ihre potenziellen Einnahmen abschätzen. Um dieses Feld zu aktivieren, befolgen Sie bitte die folgenden Schritte und beachten Sie die folgenden Abbildungen:
- Klicken Sie auf das Symbol „Spalten“, um ein Dropdown-Menü mit Feldern zu öffnen, die Sie Ihrem Bericht hinzufügen können.
- Aktivieren Sie die Kontrollkästchen für Kundenland und Kunden-ID
Diese Felder werden im Bericht automatisch ausgefüllt:

Reporting für SubID- und SharedID-Tracking-Parameter
Wenn Sie in Ihrer Tracking-URL SubID- oder SharedID-Parameter verwenden , können Sie diese Informationen auch in den Berichten anzeigen, indem Sie die folgenden Schritte ausführen.
Diese Parameter sind nützlich, wenn Sie verschiedene Creatives oder mehrere Websites verwenden oder wenn Sie nicht-personenbezogene Benutzerinformationen senden müssen. Dies ermöglicht Ihnen tiefere Einblicke in Ihre Leistungsberichte.
- Klicken Sie zunächst im Dashboard-Modul „Link erstellen“ auf „Erweitert“.

- Dies wird erweitert, um die gemeinsame ID, mehrere SubIDs und andere Felder anzuzeigen:

- Hier können Sie SubIDs oder Shared IDs eingeben. Unter „Property“ können Sie außerdem Ihre Website auswählen (falls Sie über mehrere Websites werben und verfolgen möchten, woher die Weiterleitung kommt).
- Sobald Sie die gewünschten Informationsfelder eingegeben haben, klicken Sie einfach auf die blaue Schaltfläche " Erstellen ", und Ihr Link wird unten angezeigt.
SubID : Dies ist eine eindeutige Kennung, mit der Affiliates bestimmte Kampagnen, Traffic-Quellen oder einzelne Klicks verfolgen können. So können Sie verschiedene SubIDs verwenden, um die Leistung verschiedener Kampagnen oder Ihrer Social-Media-Konten zu überprüfen.
SharedID : Diese Kennung wird verwendet, um Benutzerinteraktionen über verschiedene Plattformen und Geräte hinweg zu verfolgen. Sie stellt sicher, dass die Benutzerreise genau verfolgt wird, auch wenn der Benutzer während der Interaktion das Gerät oder die Plattform wechselt.
